2 - 基於 Dubbo API 開發微服務應用程式
目標
從頭開始開發基於 Dubbo 的微服務
難度
低
環境需求
系統:Windows、Linux、MacOS
JDK 8 及以上版本(建議使用 JDK17)
Git
IntelliJ IDEA(可選)
Docker(可選)
實作
本章將透過逐步教學,引導您從頭開始開發微服務應用程式。
1. 啟動註冊中心
對於微服務應用程式來說,註冊中心是不可或缺的元件。只有透過註冊中心,消費者才能成功發現伺服器的地址資訊,進而發起呼叫。
為了讓本教學更易於使用,我們提供了一個基於 Apache Zookeeper 註冊中心的簡單啟動器。如果您需要在生產環境中部署註冊中心,請參考 生產環境初始化 來部署高可用的註冊中心。
Windows:
git clone --depth=1 --branch master git@github.com:apache/dubbo-samples.git
cd dubbo-samples
./mvnw.cmd clean compile exec:java -pl tools/embedded-zookeeper

Linux / MacOS:
git clone --depth=1 --branch master git@github.com:apache/dubbo-samples.git
cd dubbo-samples
./mvnw clean compile exec:java -pl tools/embedded-zookeeper

Docker:
docker run --name some-zookeeper --restart always -d zookeeper
2. 初始化專案
從本節開始,將基於 IntelliJ IDEA 建立和測試專案。
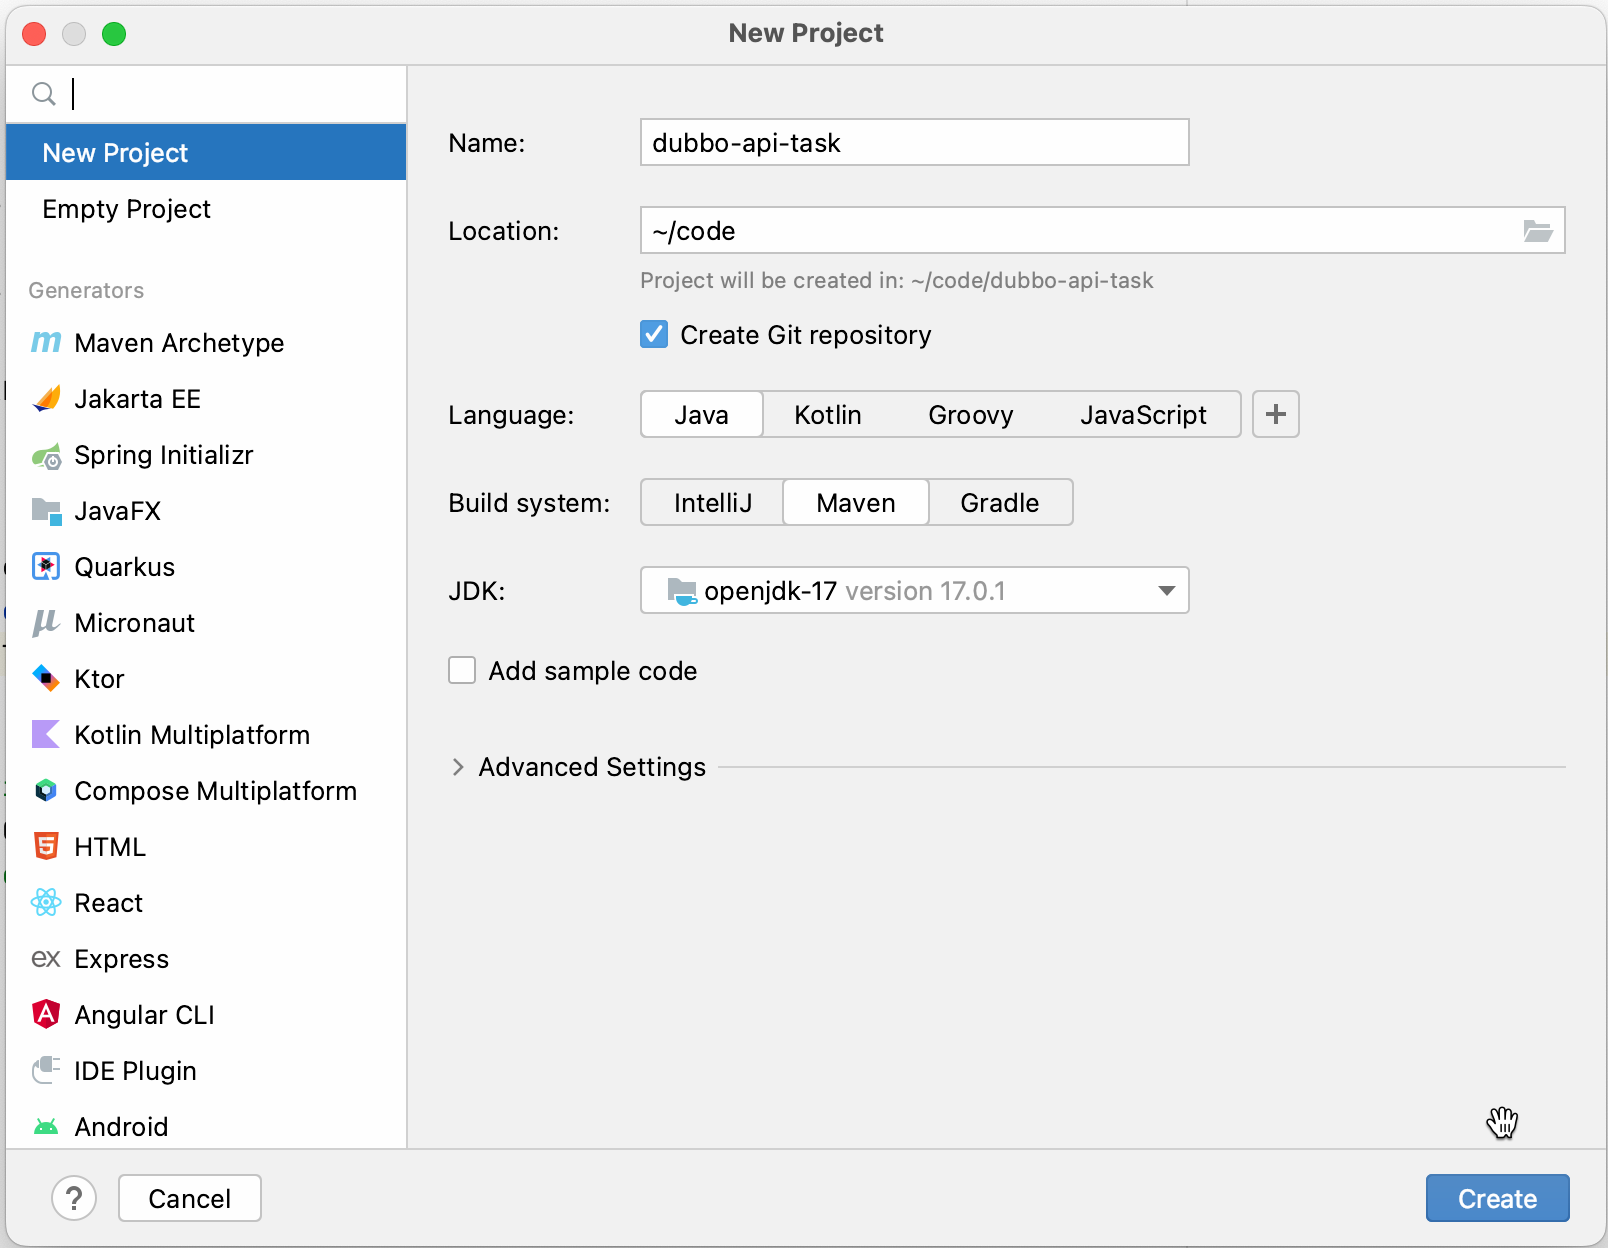
如上圖所示,可以建立一個基本專案。
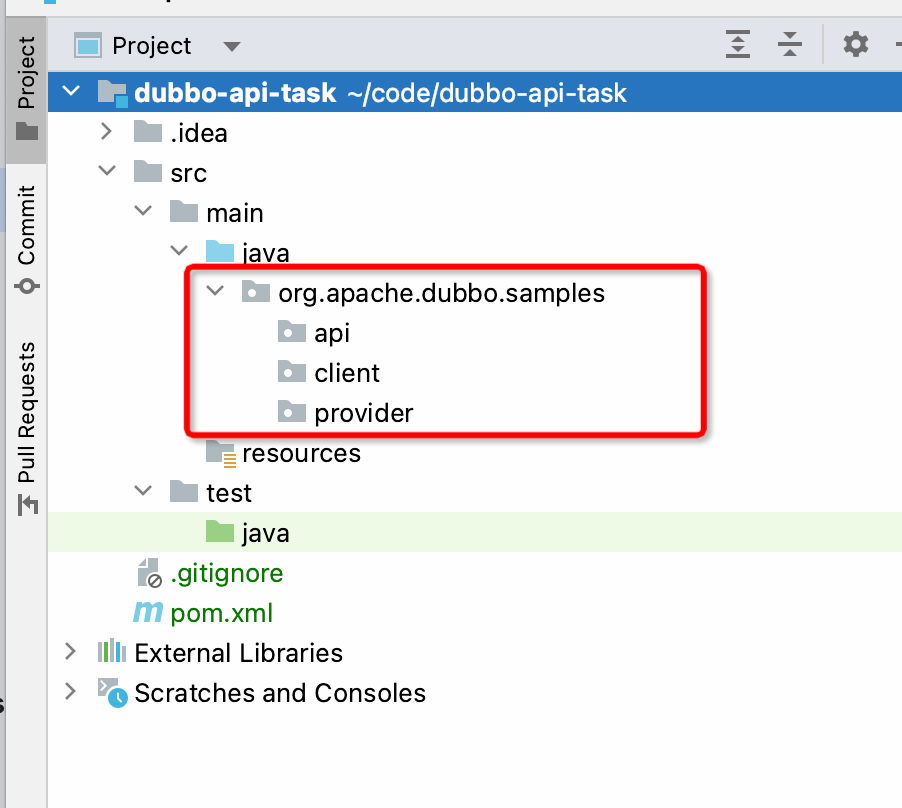
初始化專案後,您需要在 src/main/java 目錄下建立 org.apache.dubbo.samples.api、org.apache.dubbo.samples.client 和 org.apache.dubbo.samples.provider 三個套件。
未來我們將在 api 下建立對應的介面,在 client 下建立對應的客戶端訂閱服務函數,在 provider 下建立對應的伺服器端實現和發佈服務函數。
以上三個套件分別對應應用程式依賴的 API、消費者端應用程式的模組和伺服器端應用程式的模組。在實際部署時,需要拆分為三個專案,消費者和服務的共同依賴是 api 模組。為了簡化起見,本教學將在同一個專案中進行開發,以區分多個啟動類別。
3. 新增 Maven 依賴項
初始化專案後,我們首先需要加入 Dubbo 相關的 Maven dependencies。
編輯 pom.xml 檔案並加入以下設定。
    <dependencies>
        <dependency>
            <groupId>org.apache.dubbo</groupId>
            <artifactId>dubbo</artifactId>
            <version>3.2.0-beta.4</version>
        </dependency>

        <dependency>
            <groupId>org.apache.curator</groupId>
            <artifactId>curator-x-discovery</artifactId>
            <version>4.3.0</version>
        </dependency>
        <dependency>
            <groupId>org.apache.zookeeper</groupId>
            <artifactId>zookeeper</artifactId>
            <version>3.8.0</version>
            <exclusions>
                <exclusion>
                    <groupId>io.netty</groupId>
                    <artifactId>netty-handler</artifactId>
                </exclusion>
                <exclusion>
                    <groupId>io.netty</groupId>
                    <artifactId>netty-transport-native-epoll</artifactId>
                </exclusion>
            </exclusions>
        </dependency>
    </dependencies>
在此設定中,定義了 dubbo 和 zookeeper(以及對應的連接器 curator)的 dependencies。

加入上述設定後,您可以透過 IDEA 的 Maven - Reload All Maven Projects 來重新整理 dependencies。
4. 定義服務介面
服務介面是 Dubbo 中消費者和伺服器之間的橋樑。
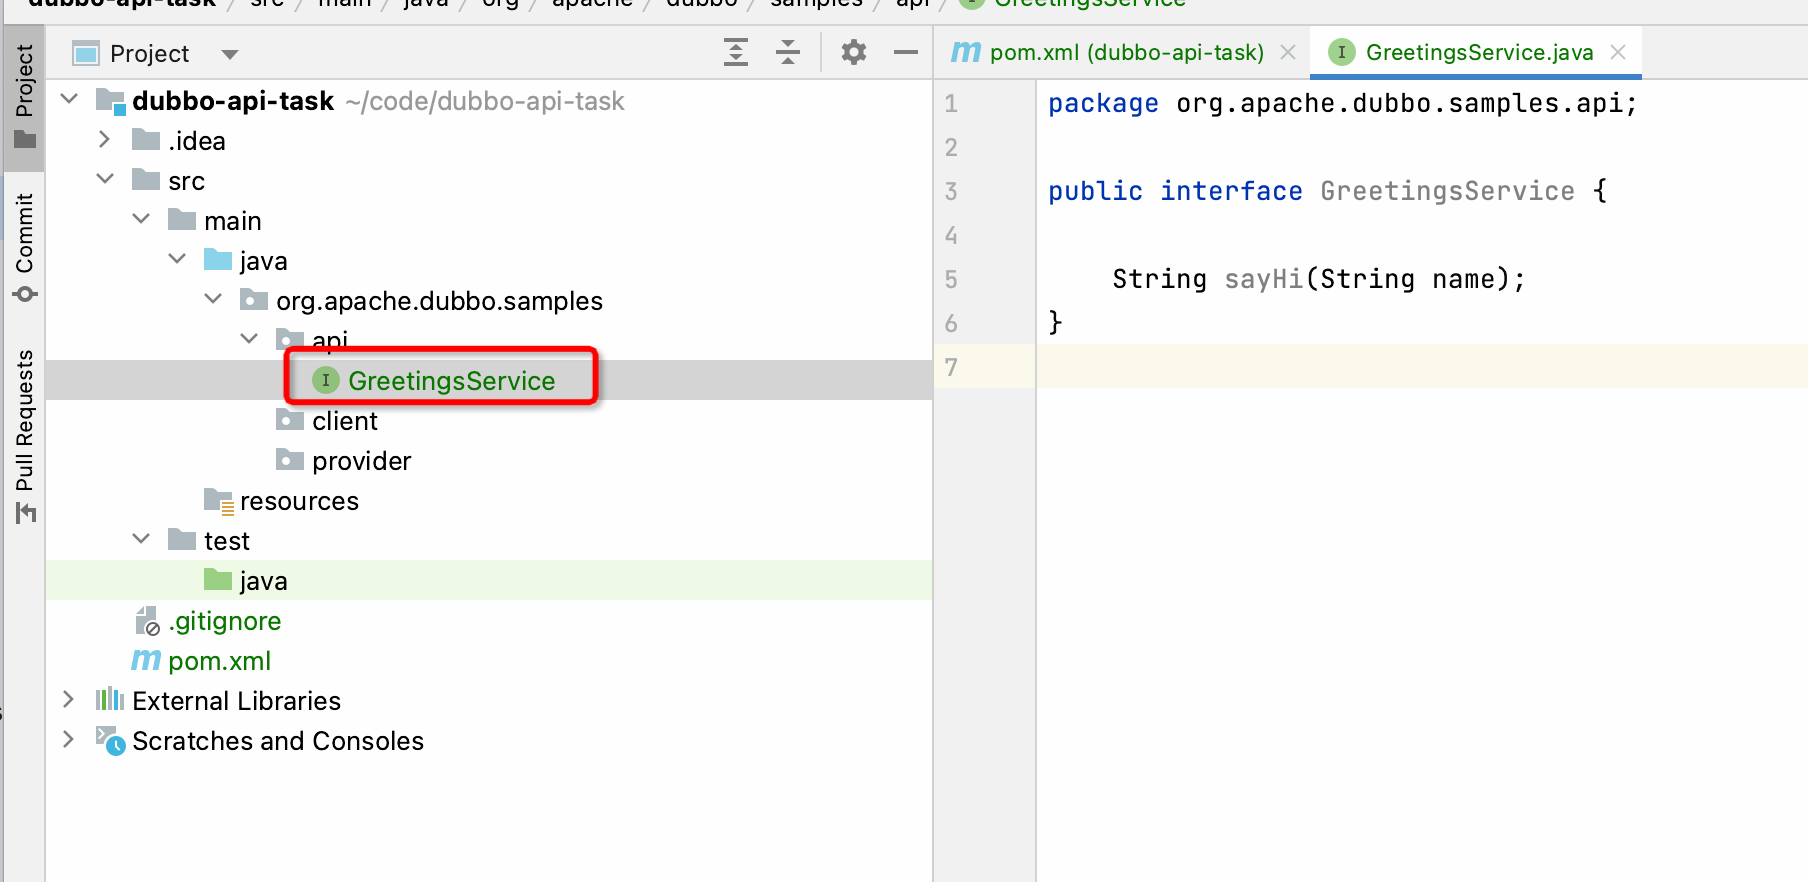
在 org.apache.dubbo.samples.api 下建立 GreetingsService 介面,定義如下:
package org.apache.dubbo.samples.api;

public interface GreetingsService {

    String sayHi(String name);
}
在 GreetingsService 中,定義了 sayHi 方法。後續伺服器發布的服務以及消費者訂閱的服務都是圍繞 GreetingsService 介面開發的。
5. 定義伺服器的實作
定義服務介面後,就可以在伺服器端定義對應的實作。與消費者端相比,這部分的實作是遠端實作,本地沒有相關資訊。
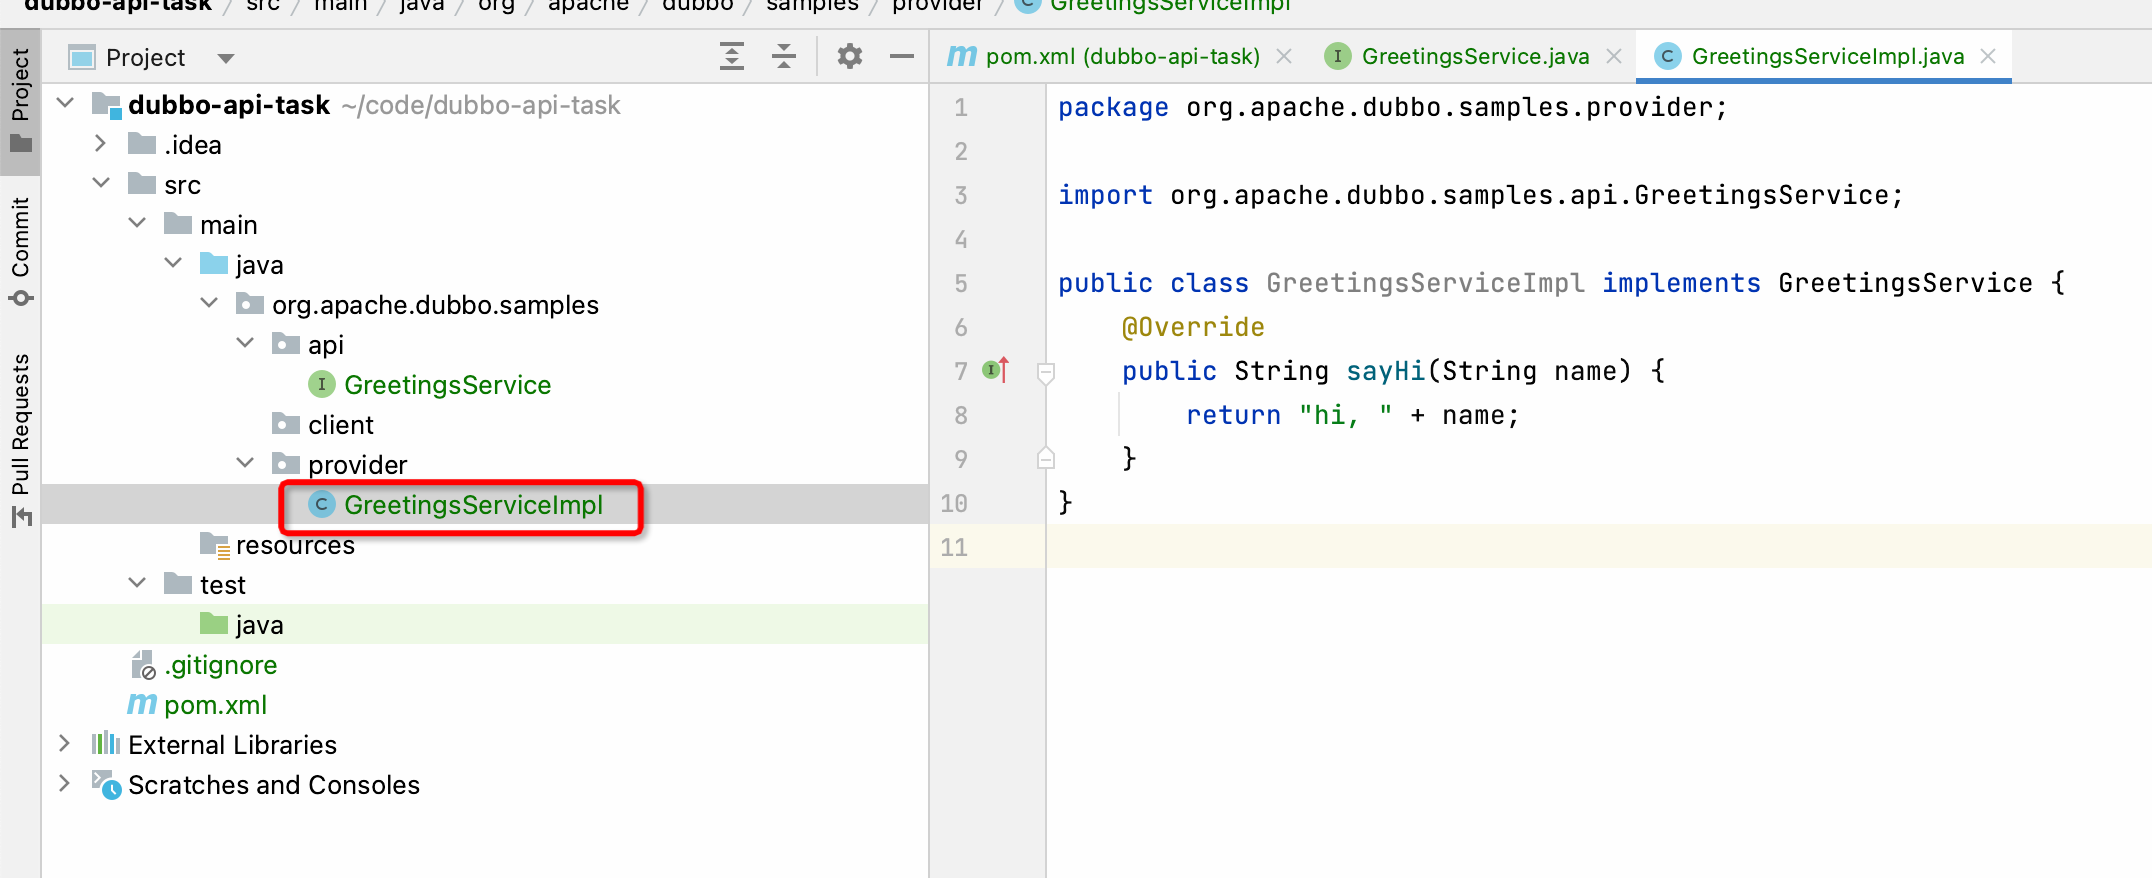
在 org.apache.dubbo.samples.provider 下建立 GreetingsServiceImpl 類別,定義如下:
package org.apache.dubbo.samples.provider;

import org.apache.dubbo.samples.api.GreetingsService;

public class GreetingsServiceImpl implements GreetingsService {
    @Override
    public String sayHi(String name) {
        return "hi," + name;
    }
}
在 GreetingsServiceImpl 中,實作 GreetingsService 介面,讓 sayHi 方法回傳 hi, name。
6. 伺服器發布服務
實作服務後,本節將透過 Dubbo 的 API 將服務發布到網路上。
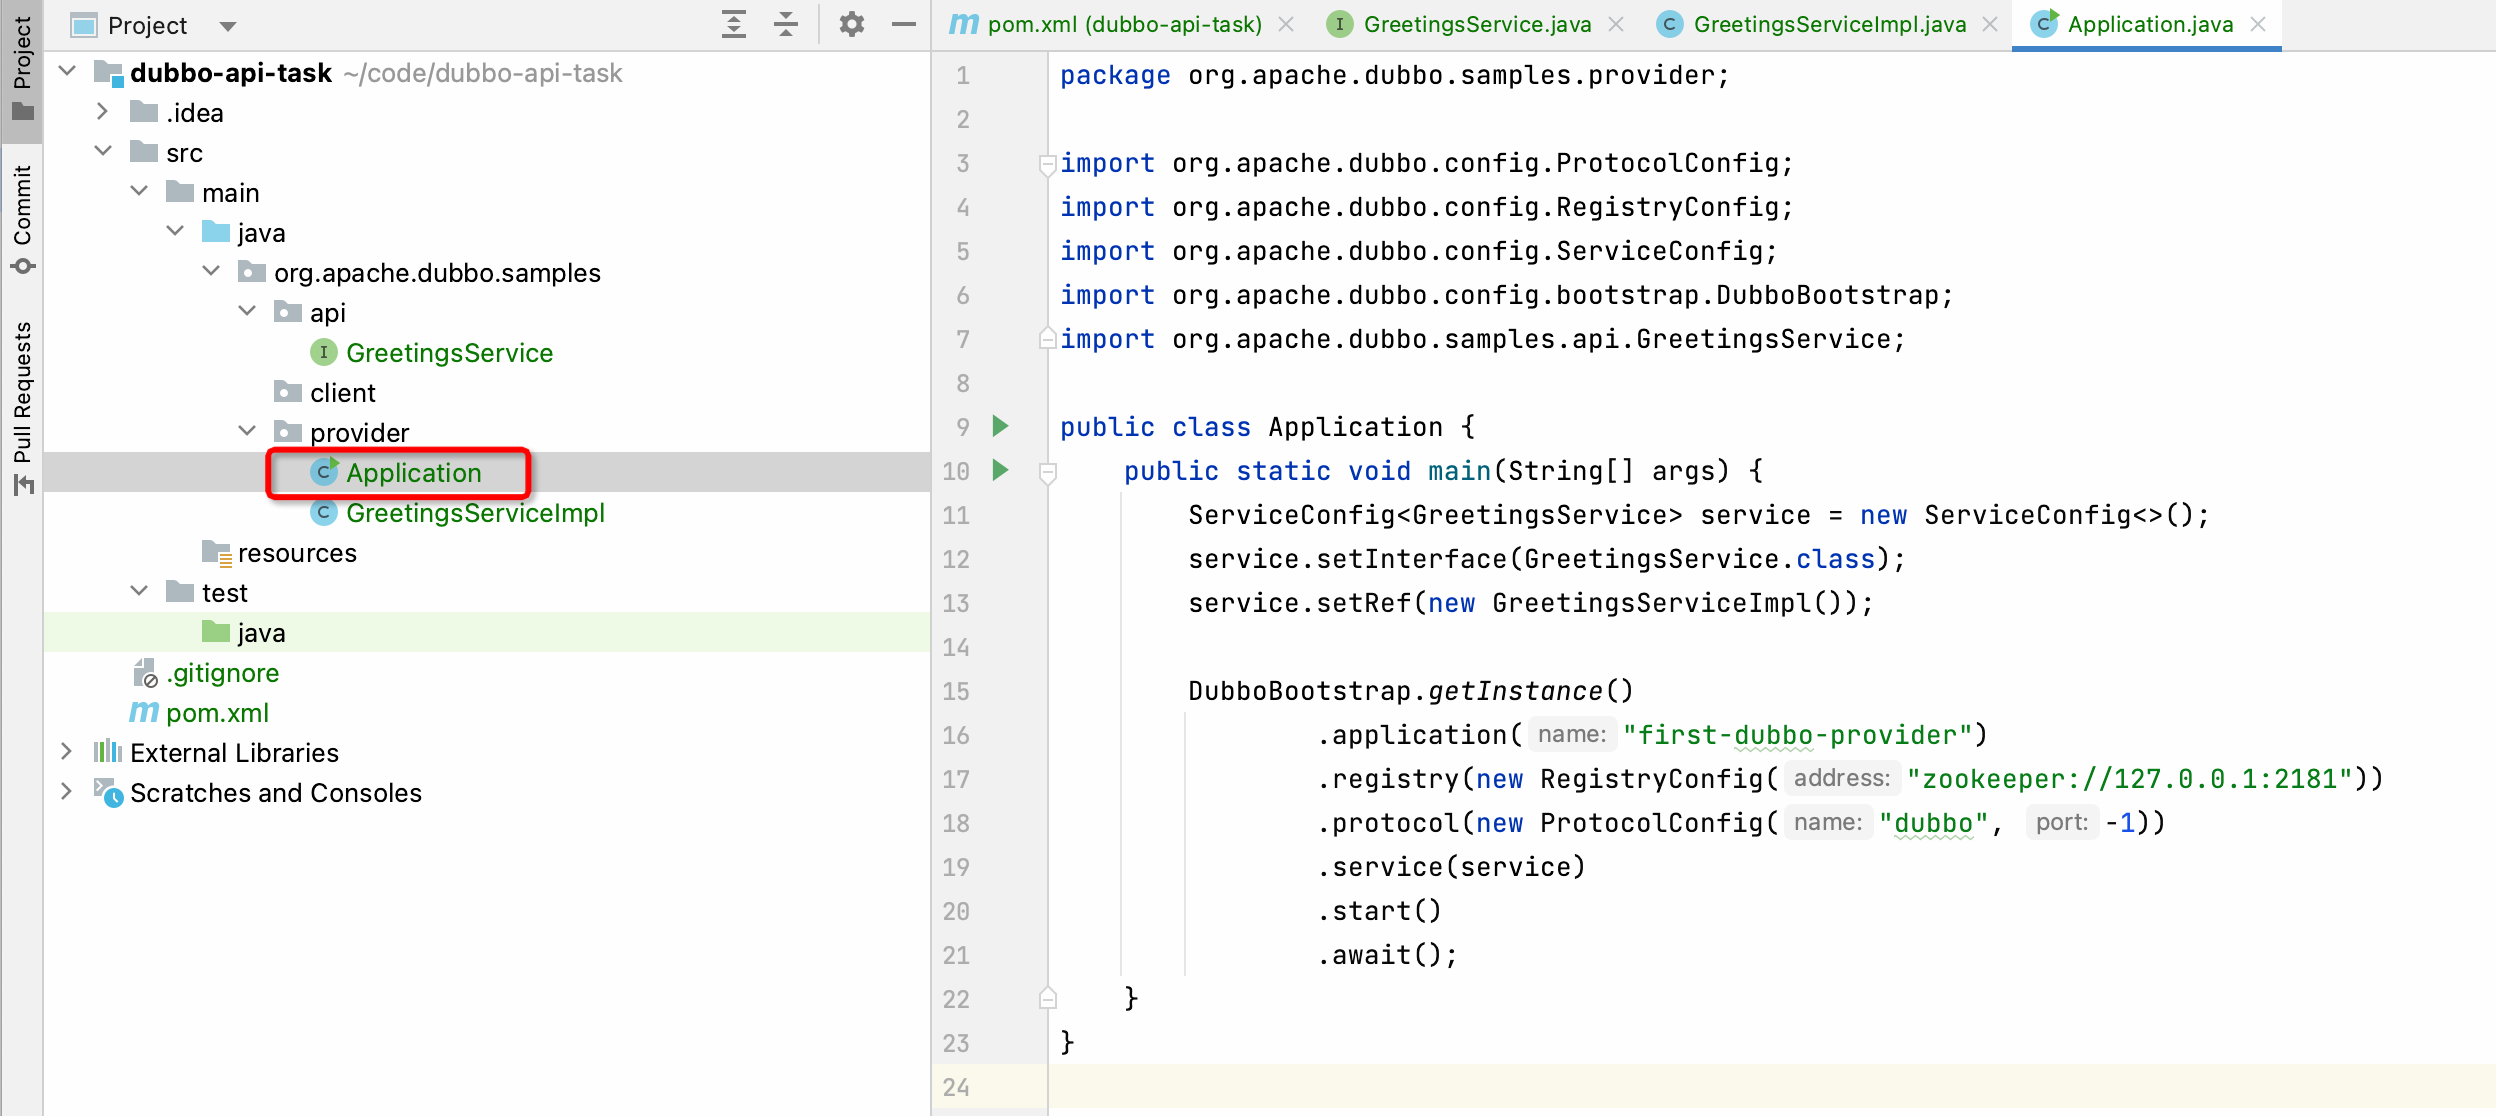
在 org.apache.dubbo.samples.provider 下建立 Application 類別,定義如下:
package org.apache.dubbo.samples.provider;

import org.apache.dubbo.config.ProtocolConfig;
import org.apache.dubbo.config.RegistryConfig;
import org.apache.dubbo.config.ServiceConfig;
import org.apache.dubbo.config.bootstrap.DubboBootstrap;
import org.apache.dubbo.samples.api.GreetingsService;

public class Application {
    public static void main(String[] args) {
        // define a specific service
        ServiceConfig<GreetingsService> service = new ServiceConfig<>();
        service.setInterface(GreetingsService.class);
        service.setRef(new GreetingsServiceImpl());

        // start Dubbo
        DubboBootstrap. getInstance()
                .application("first-dubbo-provider")
                .registry(new RegistryConfig("zookeeper://127.0.0.1:2181"))
                .protocol(new ProtocolConfig("dubbo", -1))
                .service(service)
                .start()
                .await();
    }
}
在 org.apache.dubbo.samples.provider.Application 中,主要有兩部分功能:首先,基於 ServiceConfig 定義發布的服務資訊,包含介面資訊和對應的實作類別物件;其次,設定 Dubbo 啟動器,傳入應用程式名稱、註冊中心地址、協定資訊以及服務資訊。
注意:DubboBootstrap 中的 registry、protocol 和 service 可以多次傳入。
7. 消費者訂閱和呼叫
對於消費者端,可以透過 Dubbo 的 API 訂閱服務。

在 org.apache.dubbo.samples.client 下建立 Application 類別,定義如下:
package org.apache.dubbo.samples.client;

import java.io.IOException;

import org.apache.dubbo.config.ReferenceConfig;
import org.apache.dubbo.config.RegistryConfig;
import org.apache.dubbo.config.bootstrap.DubboBootstrap;
import org.apache.dubbo.samples.api.GreetingsService;

public class Application {
    public static void main(String[] args) throws IOException {
        ReferenceConfig<GreetingsService> reference = new ReferenceConfig<>();
        reference.setInterface(GreetingsService.class);

        DubboBootstrap. getInstance()
                .application("first-dubbo-consumer")
                .registry(new RegistryConfig("zookeeper://127.0.0.1:2181"))
                .reference(reference);

        GreetingsService service = reference. get();
        String message = service.sayHi("dubbo");
        System.out.println("Receive result ======> " + message);
        System.in.read();
    }
}
org.apache.dubbo.samples.client.Application 中有三項功能:
第一,基於 ReferenceConfig 定義訂閱的服務資訊,包含介面資訊。
第二,設定 Dubbo 啟動器,傳入應用程式名稱、註冊中心地址、協定資訊以及服務資訊。
最後,取得動態代理的物件並進行呼叫。
注意:DubboBootstrap 支援同時傳入 service 和 reference,這表示一個應用程式可以同時作為消費者和伺服器。
8. 啟動應用程式
截至步驟 7,程式碼已經開發完成,本節將啟動整個專案並進行驗證。

首先啟動 org.apache.dubbo.samples.provider.Application,稍等片刻,看到如下圖所示的日誌(DubboBootstrap awaiting),表示服務提供者已啟動,表示服務提供者可以提供服務。
[DUBBO] DubboBootstrap awaiting ..., dubbo version: 3.2.0-beta.4, current host: 169.254.44.42
接著啟動 org.apache.dubbo.samples.client.Application,稍等片刻,看到如下圖所示的日誌(hi, dubbo),表示服務消費者已啟動,並且成功取得對伺服器的呼叫結果。
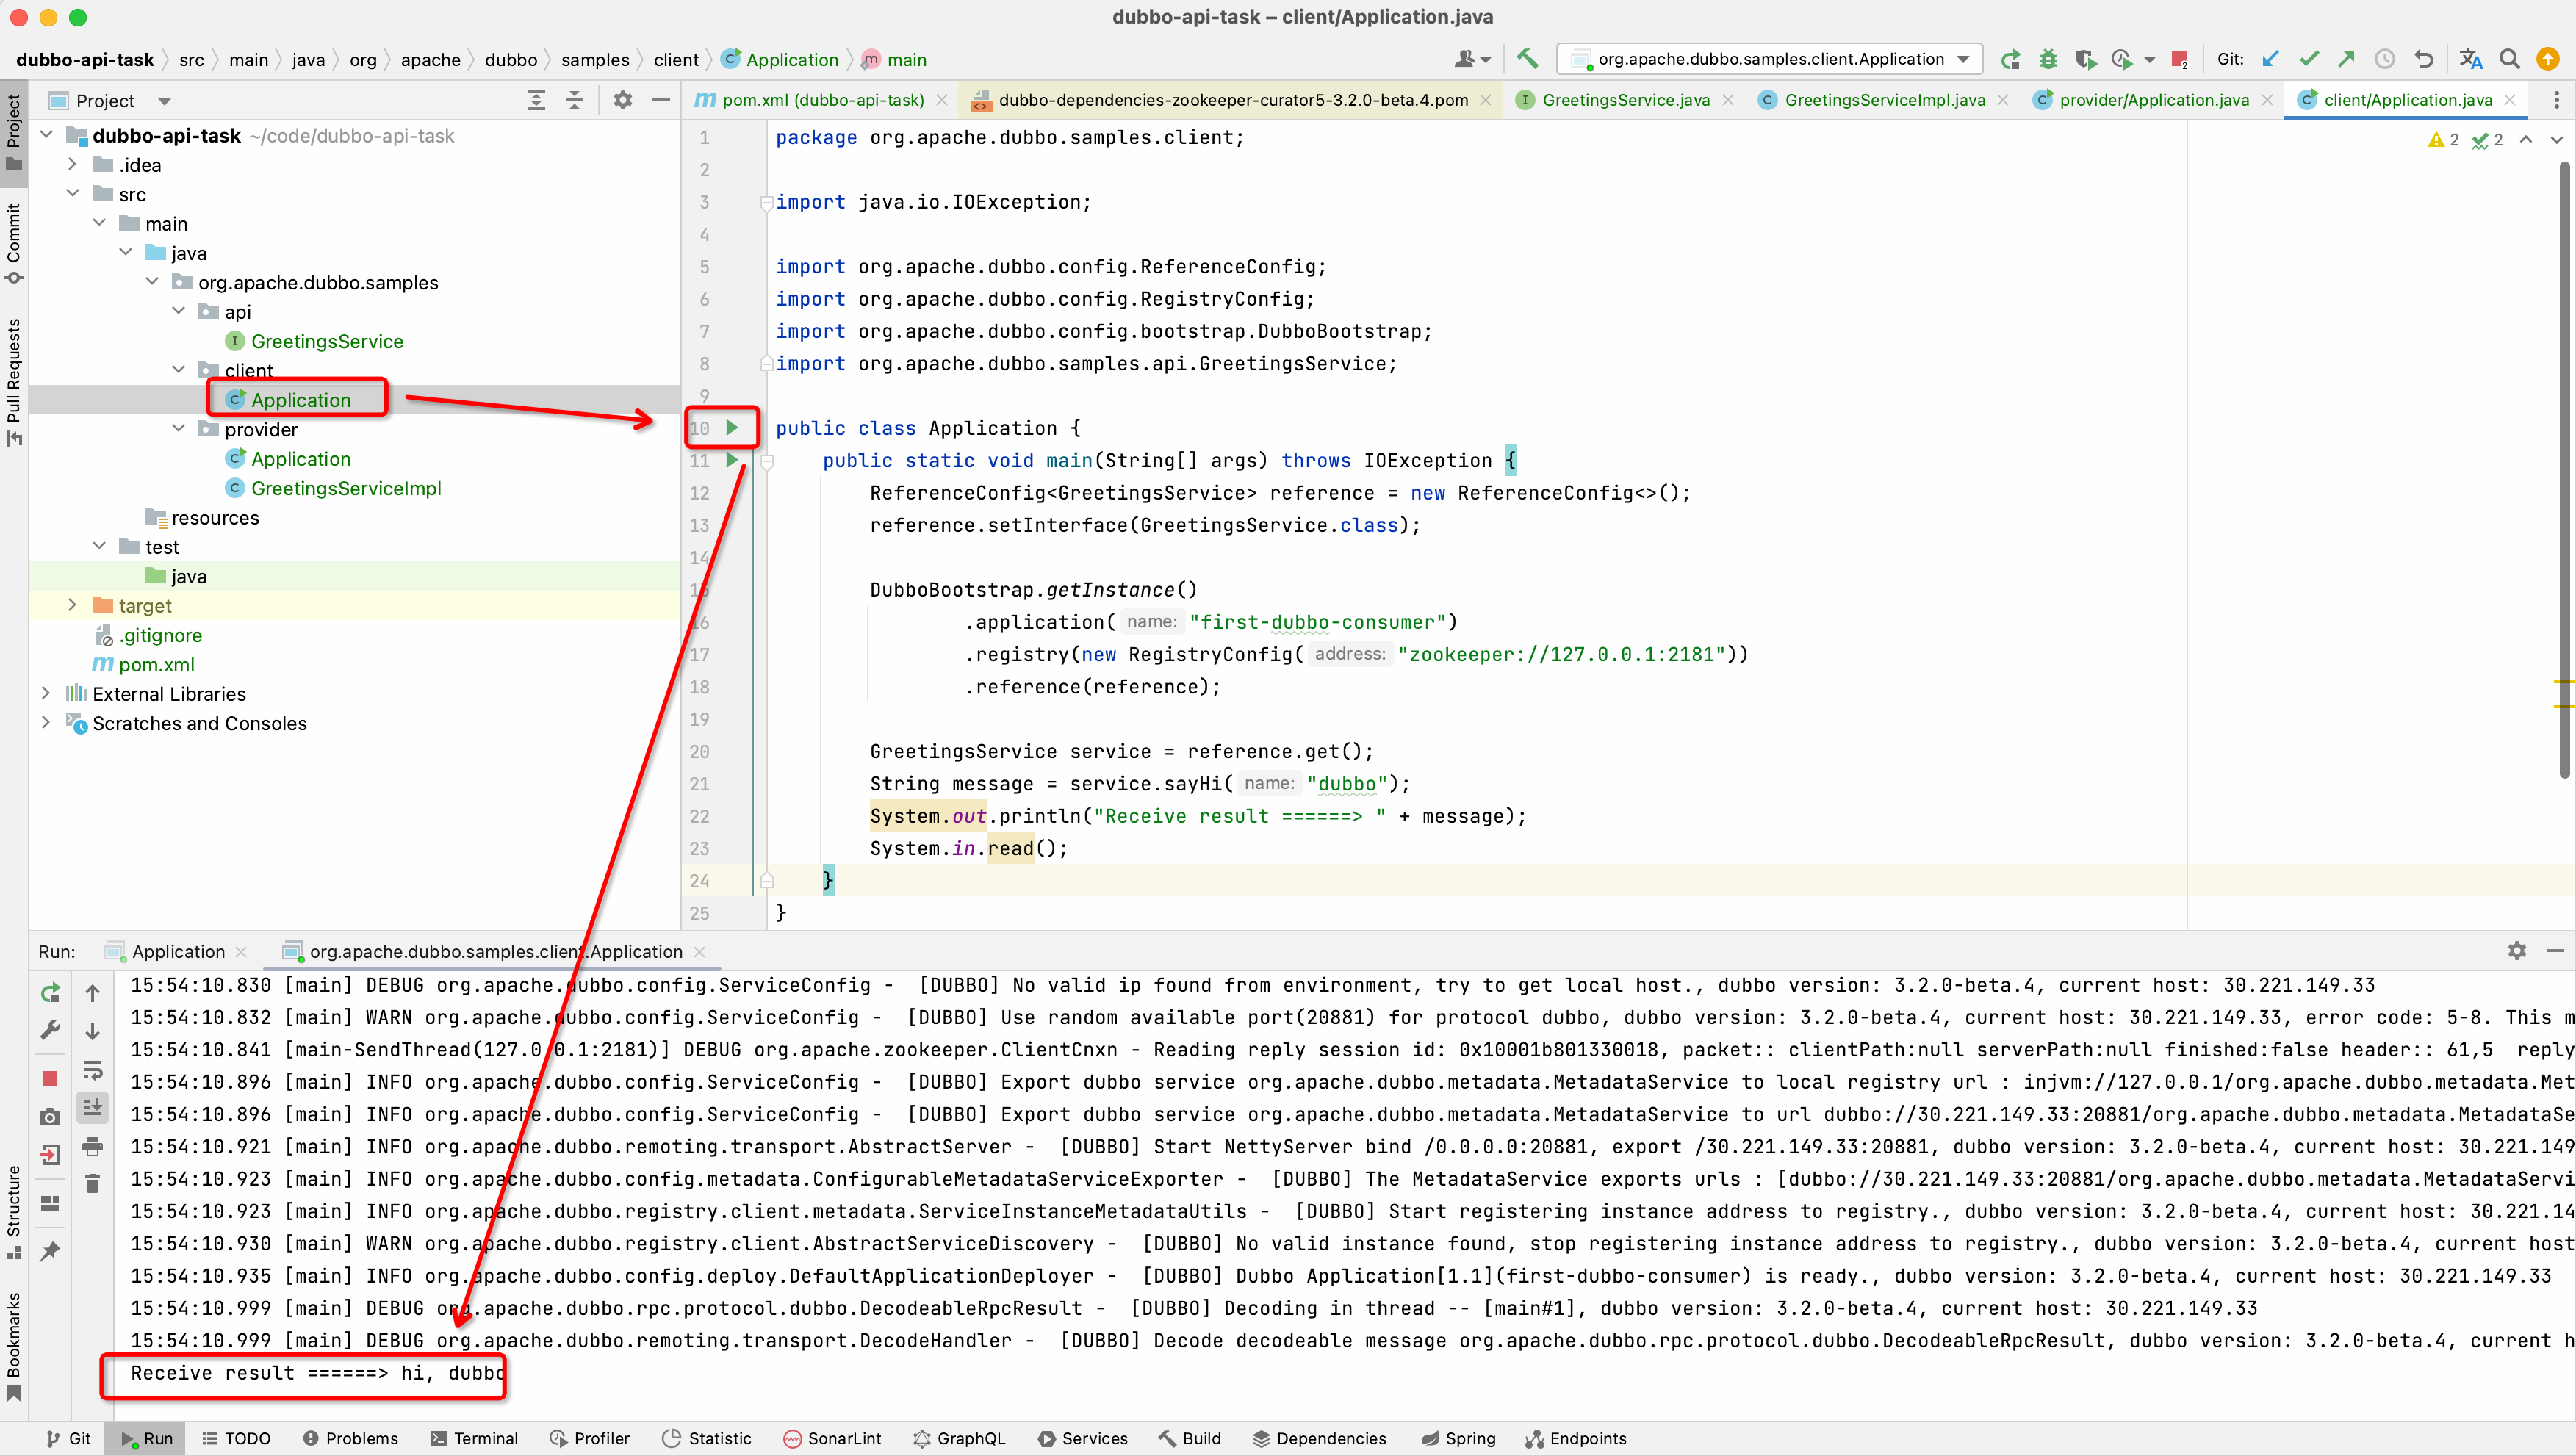
Receive result ======> hi, dubbo
延伸閱讀
1. Dubbo 設定介紹
Dubbo 的主要設定項目為 ReferenceConfig、ServiceConfig 和 DubboBootstrap。更多詳細資訊,請參考 [API 設定 | Apache Dubbo](/en/docs3-v2/java-sdk/reference-manual/config/api/) 文章。
2. 除了 API 方法之外的其他使用方法
除了 API 方式之外,Dubbo 也支援 Spring XML、Annotation 以及 Spring Boot 等設定方式。在下一份教學中,我們將說明如何使用 Spring Boot 設定方式快速開發。
關於 XML 和 Annotation 的詳細資訊,請參考 XML 設定 | Apache Dubbo、[Annotation 設定 | Apache Dubbo](/en/docs3- v2/java-sdk/reference-manual/config/annotation/)。
更多
本教學介紹如何基於 Dubbo 的純 API 開發微服務應用程式。在下一份教學中,我們將介紹如何基於 Spring Boot 開發微服務專案。