分散式交易
如何使用
第一步
首次訪問:https://seata.apache.org/unversioned/download/seata-server
下載我們需要使用的 seata1.5.2 服務
第二步
- 將 undo_log 表格新增到參與全域交易的資料庫中(TCC、SAGA、XA 可以跳過此步驟)
-- for AT mode you must to init this sql for you business database. the seata server not need it.
CREATE TABLE IF NOT EXISTS `undo_log`
(
    `branch_id` BIGINT(20) NOT NULL COMMENT 'branch transaction id',
    `xid` VARCHAR(100) NOT NULL COMMENT 'global transaction id',
    `context` VARCHAR(128) NOT NULL COMMENT 'undo_log context, such as serialization',
    `rollback_info` LONGBLOB NOT NULL COMMENT 'rollback info',
    `log_status` INT(11) NOT NULL COMMENT '0: normal status,1: defense status',
    `log_created` DATETIME(6) NOT NULL COMMENT 'create datetime',
    `log_modified` DATETIME(6) NOT NULL COMMENT 'modify datetime',
    UNIQUE KEY `ux_undo_log` (`xid`, `branch_id`)
) ENGINE = InnoDB
  AUTO_INCREMENT = 1
  DEFAULT CHARSET = utf8 COMMENT = 'AT transaction mode undo table';
- 在您的 mysql 資料庫中建立一個名為 seata 的資料庫,並使用以下 sql
-- -------------------------------- The script used when storeMode is 'db' ------- -------------------------
-- the table to store GlobalSession data
CREATE TABLE IF NOT EXISTS `global_table`
(
    `xid` VARCHAR(128) NOT NULL,
    `transaction_id` BIGINT,
    `status` TINYINT NOT NULL,
    `application_id` VARCHAR(32),
    `transaction_service_group` VARCHAR(32),
    `transaction_name` VARCHAR(128),
    `timeout` INT,
    `begin_time` BIGINT,
    `application_data` VARCHAR(2000),
    `gmt_create` DATETIME,
    `gmt_modified` DATETIME,
    PRIMARY KEY (`xid`),
    KEY `idx_gmt_modified_status` (`gmt_modified`, `status`),
    KEY `idx_transaction_id` (`transaction_id`)
) ENGINE = InnoDB
  DEFAULT CHARSET = utf8;

-- the table to store BranchSession data
CREATE TABLE IF NOT EXISTS `branch_table`
(
    `branch_id` BIGINT NOT NULL,
    `xid` VARCHAR(128) NOT NULL,
    `transaction_id` BIGINT,
    `resource_group_id` VARCHAR(32),
    `resource_id` VARCHAR(256),
    `branch_type` VARCHAR(8),
    `status` TINYINT,
    `client_id` VARCHAR(64),
    `application_data` VARCHAR(2000),
    `gmt_create` DATETIME(6),
    `gmt_modified` DATETIME(6),
    PRIMARY KEY (`branch_id`),
    KEY `idx_xid` (`xid`)
) ENGINE = InnoDB
  DEFAULT CHARSET = utf8;

-- the table to store lock data
CREATE TABLE IF NOT EXISTS `lock_table`
(
    `row_key` VARCHAR(128) NOT NULL,
    `xid` VARCHAR(96),
    `transaction_id` BIGINT,
    `branch_id` BIGINT NOT NULL,
    `resource_id` VARCHAR(256),
    `table_name` VARCHAR(32),
    `pk` VARCHAR(36),
    `gmt_create` DATETIME,
    `gmt_modified` DATETIME,
    PRIMARY KEY (`row_key`),
    KEY `idx_branch_id` (`branch_id`)
) ENGINE = InnoDB
  DEFAULT CHARSET = utf8;
第三步
將 seata 依賴項引入您的專案
spring-boot 應用程式
            <dependency>
                <groupId>io.seata</groupId>
                <artifactId>seata-spring-boot-starter</artifactId>
                <version>1.5.2</version>
            </dependency>
spring 應用程式
            <dependency>
                <groupId>io.seata</groupId>
                <artifactId>seata-all</artifactId>
                <version>1.5.2</version>
            </dependency>
第四步
spring-boot 應用程式
參考 seata/script/client/spring at develop seata/seata (github.com)
將其新增到您專案的 application.yml 中。
seata:
  enabled: true
  application-id: applicationName
  tx-service-group: my_test_tx_group
  enable-auto-data-source-proxy: true #Only AT and XA modes need to be true, and the data source will be automatically proxied after opening
  data-source-proxy-mode: AT #Optional AT&XA
  config:
    type: nacos
    nacos:
      #namespace: If the configuration is created in a non-default namespace, please fill in the id of the namespace here
      serverAddr: 127.0.0.1:8848
      group: SEATA_GROUP
      username: "nacos"
      password: "nacos"
      data-id: seata.properties
  registry:
    type: nacos
    nacos:
      application: seata-server
      server-addr: 127.0.0.1:8848
      group: SEATA_GROUP
      #namespace: If the configuration is created in a non-default namespace, please fill in the id of the namespace here
      username: "nacos"
      password: "nacos"
spring 應用程式
在 registry.conf 下新增 seata/script/client/conf at develop · seata/seata (github.com),因為高可用性部署使用第三方配置中心,因此不需要 file.conf
registry {
  # file, nacos, eureka, redis, zk, consul, etcd3, sofa, custom
  type = "nacos"
  nacos {
    application = "seata-server"
    serverAddr = "127.0.0.1:8848"
    group = "SEATA_GROUP"
    namespace = ""
    username = ""
    password = ""
    ##if use MSE Nacos with auth, mutex with username/password attribute
    #accessKey = ""
    #secretKey = ""
    ##if use Nacos naming meta-data for SLB service registry, specify nacos address pattern rules here
    #slbPattern = ""
  }
}

config {
  # file, nacos, apollo, zk, consul, etcd3, springCloudConfig, custom
  type = "nacos"
  nacos {
    serverAddr = "127.0.0.1:8848"
    namespace = ""
    group = "SEATA_GROUP"
    username = ""
    password = ""
    ##if use MSE Nacos with auth, mutex with username/password attribute
    #accessKey = ""
    #secretKey = ""
    dataId = "seata.properties"
  }
}
第五步
執行您下載的 nacos,並參考 https://github.com/seata/seata/tree/develop/script/config-center 並修改 config.txt
#Only used by client
#The transaction group is called my_test_tx_group and the corresponding seata-server cluster is default
service.vgroupMapping.my_test_tx_group=default
#The following are only used by server
store.mode=db
store.db.datasource=druid
store.db.dbType=mysql
store.db.driverClassName=com.mysql.jdbc.Driver
store.db.url=jdbc:mysql://127.0.0.1:3306/seata?useUnicode=true
store.db.user=username
store.db.password=password
store.db.minConn=5
store.db.maxConn=30
store.db.globalTable=global_table
store.db.branchTable=branch_table
store.db.queryLimit=100
store.db.lockTable=lock_table
store.db.maxWait=5000
開啟 nacos 主控台,在相應的命名空間下建立一個 dataId 為 seata.properties 的配置,將群組填寫為 SEATA_GROUP,並將上述內容填寫進去,並選擇類型為 properties 儲存 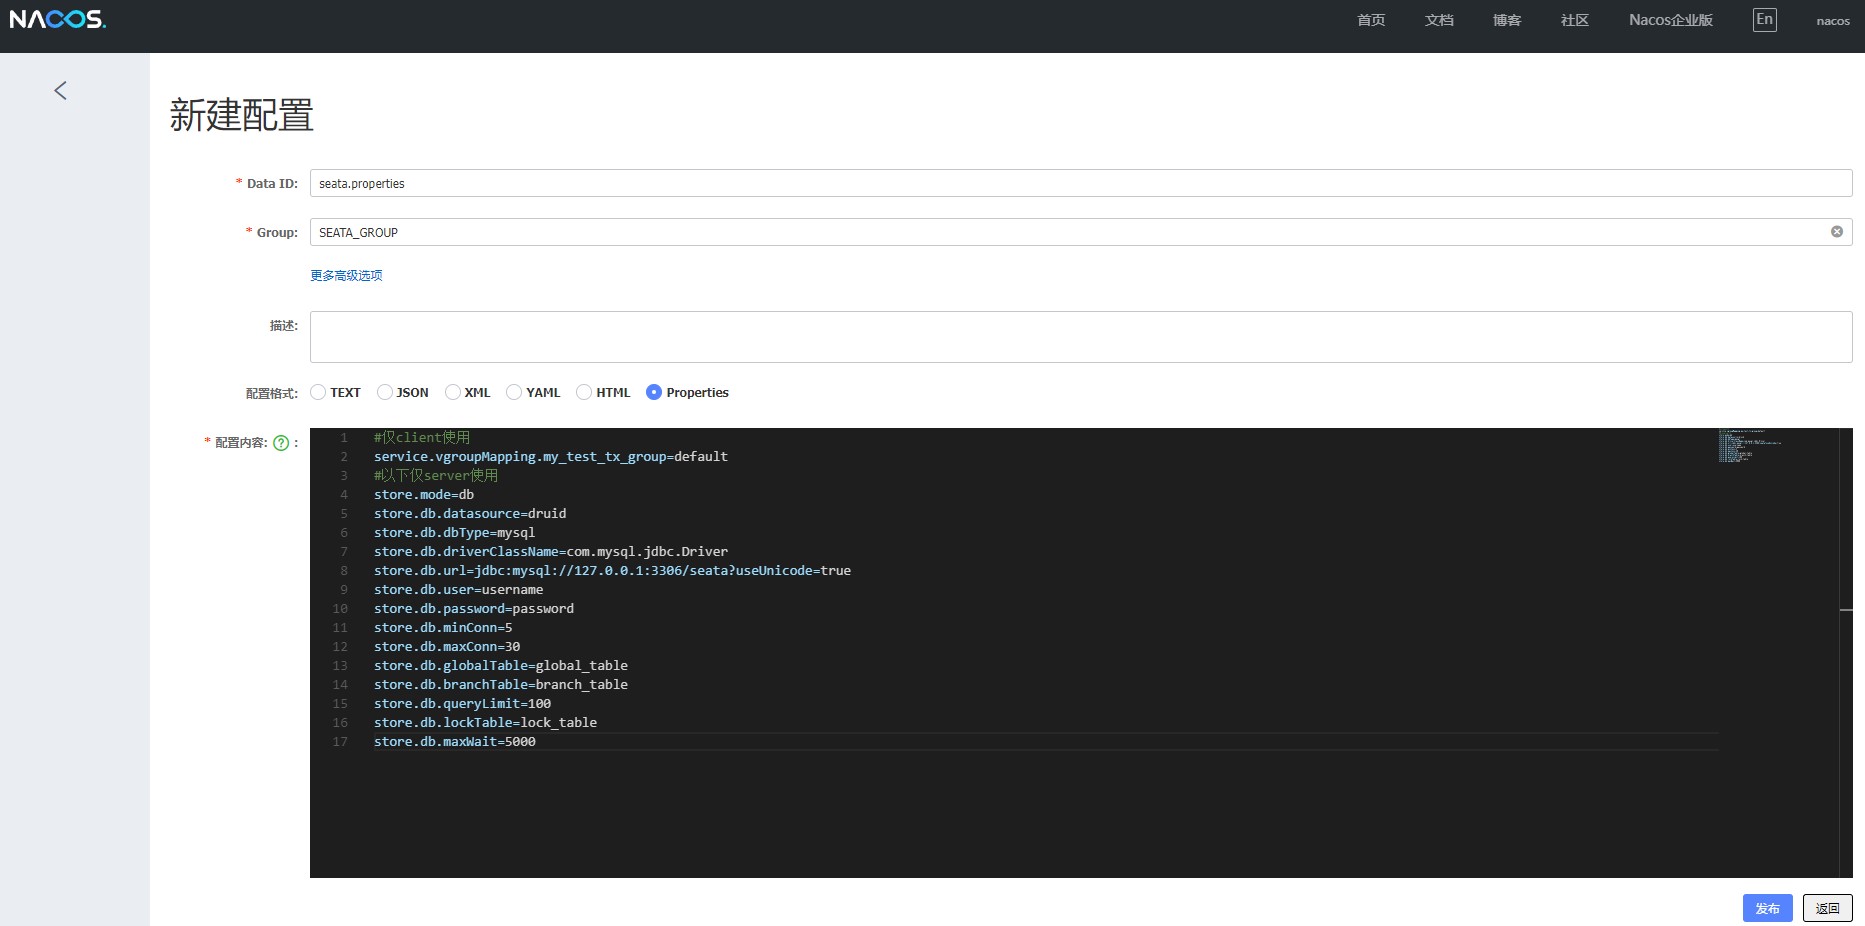
第六步
在伺服器中更改 application.yml
server:
  port: 7091

spring:
  application:
    name: seata-server

record:
  config: classpath:logback-spring.xml
  file:
    path: ${user.home}/logs/seata

console:
  user:
    username: seata
    password: seata

seata:
  config:
    # support: nacos, consul, apollo, zk, etcd3
    type: nacos
    nacos:
      server-addr: 127.0.0.1:8848
      #namespace: If the configuration is created in a non-default namespace, please fill in the id of the namespace here
      group: SEATA_GROUP
      username:
      password:
      ##if use MSE Nacos with auth, mutex with username/password attribute
      #access-key: ""
      #secret-key: ""
      data-id: seata.properties
  registry:
    # support: nacos, eureka, redis, zk, consul, etcd3, sofa
    type: nacos
    nacos:
      application: seata-server
      server-addr: 127.0.0.1:8848
      group: SEATA_GROUP
      namespace:
      cluster: default
      #namespace: If the configuration is created in a non-default namespace, please fill in the id of the namespace here
      password:
      ##if use MSE Nacos with auth, mutex with username/password attribute
      #access-key: ""
      #secret-key: ""
# server:
# service-port: 8091 #If not configured, the default is '${server.port} + 1000'
  security:
    secretKey: SeataSecretKey0c382ef121d778043159209298fd40bf3850a017
    tokenValidityInMilliseconds: 1800000
    ignore:
      urls: /,/**/*.css,/**/*.js,/**/*.html,/**/*.map,/**/*.svg,/**/*. png, /**/*.ico, /console-fe/public/**, /api/v1/auth/login
第七步
在全域交易呼叫者(發起全域交易的服務)的介面上新增 @GlobalTransactional 的範例如下
@GetMapping(value = "testCommit")
@GlobalTransactional
public Object testCommit(@RequestParam(name = "id",defaultValue = "1") Integer id,
    @RequestParam(name = "sum", defaultValue = "1") Integer sum) {
    Boolean ok = productService. reduceStock(id, sum);
    if (ok) {
        LocalDateTime now = LocalDateTime.now();
        Orders orders = new Orders();
        orders.setCreateTime(now);
        orders.setProductId(id);
        orders. setReplaceTime(now);
        orders. setSum(sum);
        orderService. save(orders);
        return "ok";
    } else {
        return "fail";
    }
}
Spring 應用程式在使用 AT 或 XA 模式時,需要手動代理資料來源以選擇事務模式並初始化事務掃描器。
@Primary
@Bean("dataSource")
public DataSource dataSource(DataSource druidDataSource) {
    //AT agent choose one of the two
    return new DataSourceProxy(druidDataSource);
    //XA Proxy
    return new DataSourceProxyXA(druidDataSource)
}
       @Bean
       public GlobalTransactionScanner globalTransactionScanner() {
           return new GlobalTransactionScanner("application name", "my_test_tx_group");
       }
如果使用 TCC 模式,則需要在對應 Provider 的 ServiceImpl 中額外定義兩階段的 try、confirm(提交)和 cancel(回滾)。
Spring Boot 應用程式需要關閉資料來源代理。
seata:
  enable-auto-data-source-proxy: false
/**
 * Define two-phase commit name = the bean name of the tcc, globally unique commitMethod = commit is the two-phase confirmation method rollbackMethod = rollback is the two-phase cancellation method
 * useTCCFence=true is to enable anti-hanging
 * BusinessActionContextParameter annotation to pass parameters to the second stage
 *
 * @param params - input parameters
 * @return String
 */
@TwoPhaseBusinessAction(name = "beanName", commitMethod = "commit", rollbackMethod = "rollback", useTCCFence = true)
public void insert(@BusinessActionContextParameter(paramName = "params") Map<String, String> params) {
    logger.info("You can reserve resources here, or use the characteristics of tcc to mix with AT. In the second stage, use the messages stored here in the first stage and send them out through the second stage, such as redis, mq and other operations");
}

/**
 * The confirmation method can be named otherwise, but it must be consistent with the commitMethod. The context can pass the parameters of the try method
 *
 * @param context context
 * @return boolean
 */
public void commit(BusinessActionContext context) {
    logger.info("Reserved resources are actually processed, or send mq messages and redis storage");
}

/**
 * Two-stage cancellation method
 *
 * @param context context
 * @return boolean
 */
public void rollback(BusinessActionContext context) {
    logger.info("Release reserved resources, or clear the message cache sent when the first phase is ready to be submitted by the second phase");
}
Linux/macOS
cd bin

sh seata-server.sh
Windows
cd bin
./seata-server.bat
運行 Seata-Server,成功後,運行您自己的服務 Dubbo Provider 和 Consumer。
第八步是構建高可用的 Seata-Server。
由於 Seata-Server 支援計算和儲存分離模式,並且支援將服務地址暴露給多個註冊中心,因此只需按照第六步進行配置,然後進行水平擴展即可。
詳情請瀏覽:https://seata.io/